
Published:
2005-01-02
Updated:
2022-09-08
Learning Ukulele with Curt
Basic `Ukulele Chord Fingering
The art and science of chord fingering. Learning your basic open position chords in common keys. We have four fingers and there're all not equal. Some shorter then others and some stronger that others. Everybody's hand is a little different. This does play a role in fingering chords.
Author(s): Curt Sheller Publisher: Curt Sheller Publications Code: ULM40
Main Category: Chords Main Instrument: Ukulele
Categories: Chords

2026-08-23
Number of Pages: 6
If you're a registered site member and have the correct permissions you can view ALL the pages of this PDF at a larger size using the LearningUkulele.com Online PDF Viewer (button below).
Download PDFThis Download IS part of your Gold Site Access and a FREE download. Thanks for supporting the site. — Curt
Each PDF file is a professionally prepared, formatted, high resolution file that prints out great. You'll need a PDF Reader or application capable of viewing PDF files to view the PDF.
NOTE: Download the current PDF file for the latest, complete, and most up-to-date version. As well as additional information not presented on-line.
The art and science of chord fingering. Learning your basic open position chords in common keys.
Fingers?
We have four fingers, and they're not all equal. Some shorter than others, and some stronger than others. Everybody's hand is a little different. This does play a role in fingering chords. An example shows up with the first chord most ukulele players learn, a C major chord. It's a one finger chord. That one finger can be anyone of your four fingers.
The combination of fingers used play a role. Whether the fingers are on adjacent strings or skipping strings, different frets or adjacent frets, the total range of frets that need to be covered, your finger dexterity, finger length, etc. There are many variables that come into play. Efficiency of motion and energy are key to any technique for fingering chords.
So, What Fingering Does One Use?
You can use any finger, any part of your fingers you like, as long as it's yours.
One thing that I've seen in my years and years of teaching with my private students and workshop attendees is — without guidance and a bit of research, one tends to pick a fingering, not based on any science — but what is perceived to be natural.
What is Natural
is often not what is efficient and low maintenance. And, often particular musical situations throws this science out the window, and you just have to get the required notes to come out. It often feels as if your fingers are playing that old game of Twister
.
You can basically use any finger you like, as long as it is yours. However, here a few points to keep in mind
More Basic `Ukulele Chord Fingering
content below, continue exploring...
More Basic `Ukulele Chord Fingering
A Few Things to Keep and Eye Out For
- Play Notes Right Behind the Frets —but not on the fret. This is the place that other allows you to apply the least amount of finger pressure. And, remember, the thumb's main role is to supply opposite and equal pressure that the finger(s) are applying.
- Longer Fingers Can Play Lower Strings — your longest finger is pretty much the middle finger, the shortest finger is your pinky, and it's a tossup between the index and ring fingers. This means when possible, use finger two on the lower (close to your nose) strings four and three.
- Dominant Fingers are Stronger — Your dominant fingers, the index and middle finger, are the strongest and can do the heavy lifting.
- Overlapping Fingers — Overlapping fingers, this is where finger three, the ring finger can overlap on the pinky, finger four. You can see this in the photo below. Finger two, the middle finger, can overlap over finger three, the ring finger. The index finger is on its own.
- Smaller Hands — Smaller hands and naturally with smaller finger can get into tighter players, i.e., those closer frets of the Soprano and Concert ukuleles.
- Explore Alternate Fingers — Given that you can use any finger you like. You can explore alternate fingerings and make music and efficiency determine to best fingering for you. In the context of a musical passage one fingering might be better than another.
The Pesky Open Position D Chord
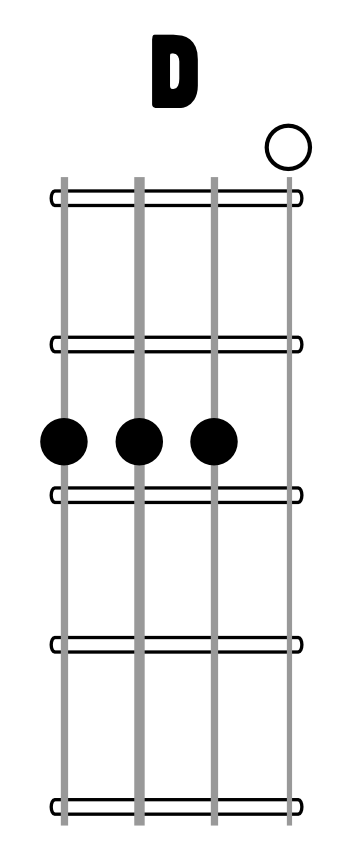
With three notes in the same fret on adjacent strings — this is one of those chords that gives players trouble.
Any fingering is possible, with a few listed that I have run across and my commentary:
- Chord Grids — A chord grid in a songbook can only show one fingering if they show one at all. And, it might not be the best finger for you or the musical situation.
- 1 2 3 —Only finger three, the ring finger can typically get right behind the fret. Sometimes finger two, the middle finger can overlap a bit on finger three and get closer to the fret but not quite on it. Finger one, the index finger, is pretty far away.
- 2 3 4 — a lot better the above finger where the smaller finger can fit in there and get closer to the frets. Still not ideal.
- 2 1 3 — Again finger one, the index finger is pretty far from the fret.
- 3 2 4 — a bit better than the previous fingering but not ideal.
- 2-2 3 — This is my
Mushy D
chord. A term I coined, try to get this chord efficient using the guidelines above. All notes are right behind the fret, string on is open and fingers one and four can spring into action for some melodic support. - 2-2-2 — Very impolite finger, as well as inefficient in that you pretty much take all the other fingers out of commission, and they can't really get ready for what might be next.
- 3-3-3 — If you've been reading the previous comments, you can guess what is going on here.
- Thumb — This is like a stagehand not staying off-stage in their support role.
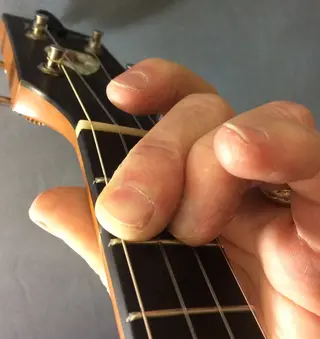
Mushy D — This is my default Fingering for D when there is not an overwhelming musical reason for a different fingering.
Bad
Fingering
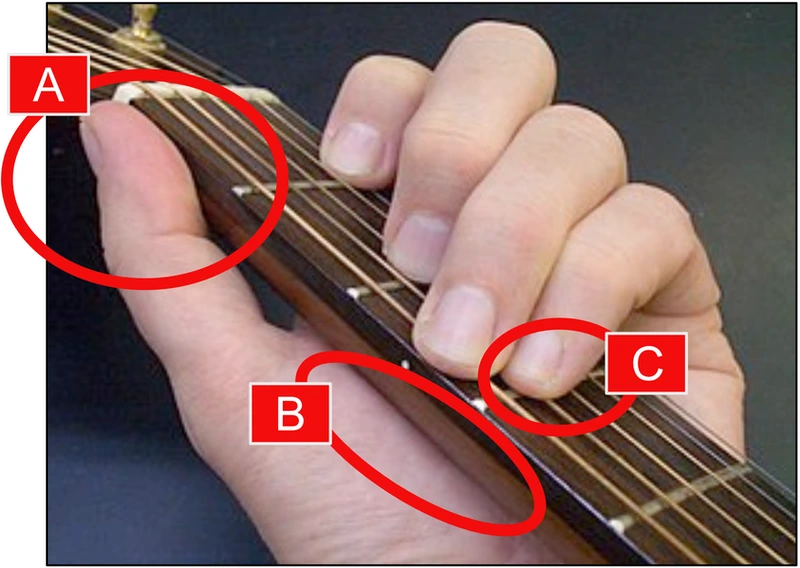
Photo from Wikipedia. No shortage of bad examples on-line.
This above photo is intended to show a chord and inadvertently shows several points of bad technique. (Curt: I added all the labels)
- A – Thumb creeping above the neck and out of its support role.
- B – Palm touching the neck, which limits the range and dexterity of the fingers' ability to finger the individual notes of a chord.
- C – The pinky on the frets and not right behind it. I'd be surprised if the C note on string five sounded when played. The same can be said for the other C note on string two and the index finger being on the frets and not behind it.
I created the following photos to show several points of bad technique:
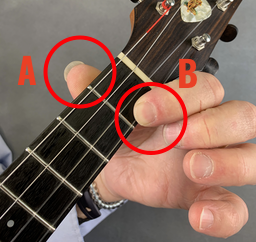
- A) Thumb too high in a non-supporting role.
- B) Too far from the fret.
- C*) Fingers not over fingerboard and out of position.
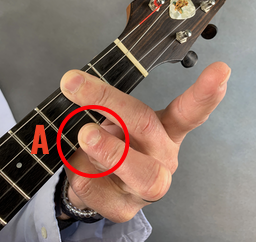
- A) Knuckle collapsed. The end knuckle of the third finger is the weakest knuckle on the hand and needs more work.
- B) "Impolite Fingering" - Finger one, the index finger, is the only finger that is really capable of a Full barre across all the four strings.
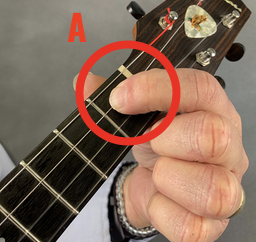
- B) Too far from the fret. Right behind the fret is the position of the least effort to get a clear note. Any further away from the fret and you need to press harder.
* All the fingers not involved in fingering the actual chords in the above photos are out of position. Most likely to show a chord fingering — but not good actually efficient fingering, and really drives home the point of why photos are not the way to show a chord.
Recap: Some Guidelines to Watch For
- Longer fingers, lower strings.
- Play notes right behind frets when possible.
- Finger Three can stack over finger Four.
- Finger Two can stack over finger Three.
- Don't take a finger off a string just to put it back on the same string.
- Finger One is a stronger barre than fingers two or three. Pinky is tricky as a barre.
- Pinky can get into tighter places than other fingers.
- Thumbs primary role is to support the fingers by applying opposite and equal pressure.
- High Thumb, over strings four, three, etc is to mute strings during fast rhythmic/percussive strums and NOT to actually to play notes.
- Keep fingers pointing to string and over the strings ready to go. Not pointing to the door, ceiling, or floor. Always ready to go.
- You can use any part of your finger to play a note in a chord. Try finger one on string four fret (5) and the same finger play string one fret (3).
Each chord in the Chord a Day Series shows alternate fingers.


End of Lesson - Thanks, Hope You Enjoyed It!
Related Lessons, Videos, Lesson Series, Songs, Books & Reference Charts, Resources & Assets, Workshops are below.