
Published:
2013-10-31
Updated:
2026-09-07
Learning Ukulele with Curt
Getting Started with `Ukulele - Lesson Six
For Lesson Six we'll add and build on the lesson and material from lesson five.
Author(s): Curt Sheller Publisher: Curt Sheller Publications Code: ULB01-wk-6
Main Category: Basics Main Instrument: Ukulele
Categories: Basics, Chords, Fingerboard, Strums, Technique, Intervals, Progressions, Beginner

2026-08-23
Show Series Lessons
Series Home
For Lessons Six we'll add and build on the lesson and material from lesson five.
In lesson six you'll learn to following:
- Review of the Key Fret Concept for Learning the Ukulele Fingerboard
- Four Finger, Single Note, Single String Fingering Drill Variations
- Primary Chords - Key of A (A, D and E)
- Common Chord Progressions for A Major
- Core Strumming Pattern Four
- Melodic Ear Training
NOTE: Although these lessons are presented as a weekly series, you can and should take as long as you like to master each week's lesson as there is a lot of material in each lesson in the series. Tuns out the understanding part is the easy part. All the hard work is in getting your hands to co-operate.
The individual lessons in this series are viewable from the Lessons button bar above.
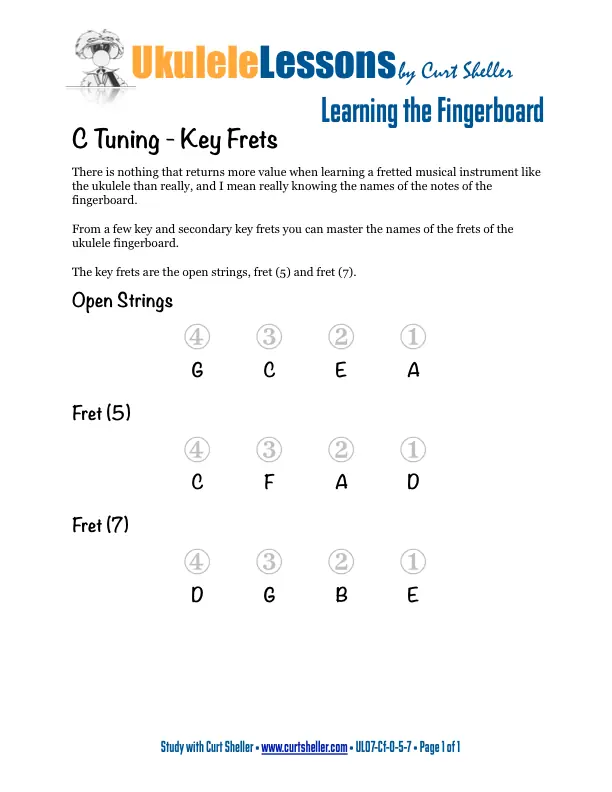
The Fingerboard - Key Frets Review
After memorizing the key frets: open strings, fret (5) and fret (7). And the secondary key frets: fret (2) and fret (10). Go back and review and memorize the frets from string one to string four.
Know the notes of the neck needs to be second nature and instant recal. This is one are of learning the ukulele that you don't even need to have the ukulele with you and can be done any time.
Recommended Lessons, Series & Resources
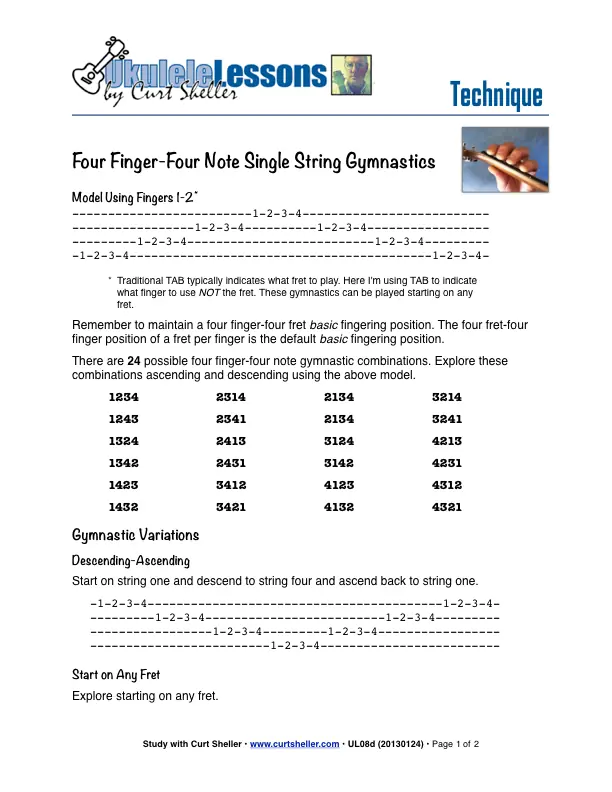
Technique - Next Steps
After the basic one, two, three and four finger single string finger gymnastics. The next phase can open be determined by addressing and observing your current technique. Without this direct one-on-one observation there are several route that you can take. Either repeating notes, open strings, developing your barre, double stops or exploring the moving the basic four finger-four frets default fingering position around the fingerboard.
Moving the four fret, four finger position around the fingerboard is all about the Six Finger Principles from The Six Secrets of Ukulele Fingering which explores the basic, slide, pass, contraction, stretch and leap fingering principles.
Recommended Lessons, Series & Resources
- Lesson: Repeating Note
- Lesson: Open Strings
- Lesson: Double Stops
- Lesson: Adjacent String Pairs
- Book: The Six Secrets of Ukulele Fingering
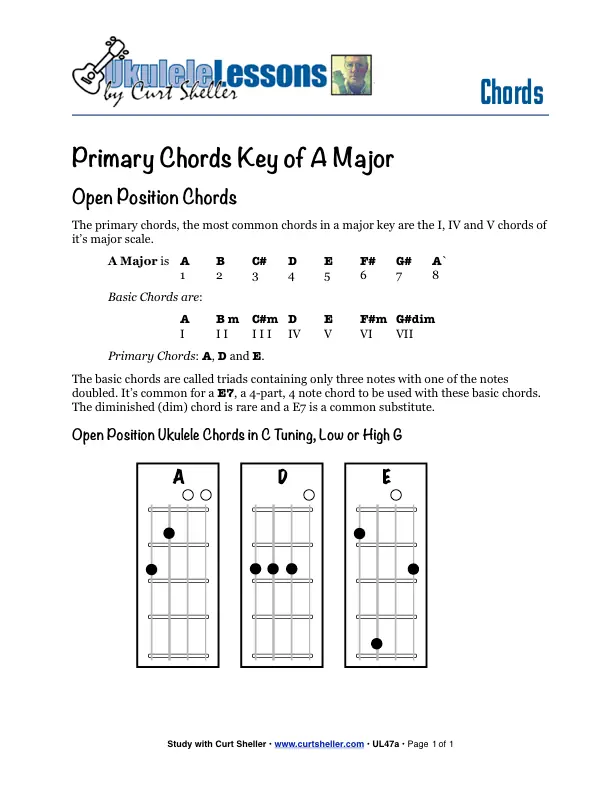
Primary Chords - A Major
The key of A major is on of the common keys that include C, G, D, A and E.
As we learned in week one’s lessons - the primary chords are the three major chords that are the main chords of the key. The primary chords create the tension and resolution in music that gives a chord progression emotion – a feeling of rest and resolution or consonance and dissonance.
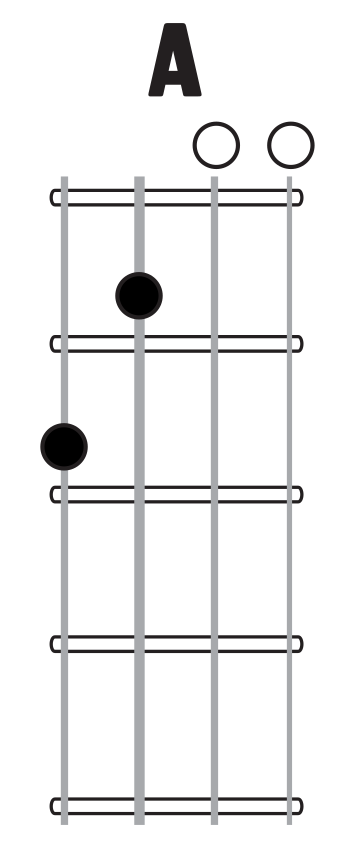
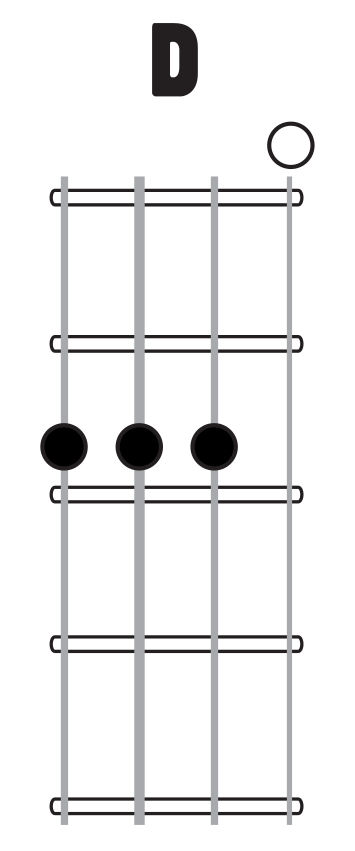
Learn the A, D, E and E7 open position chords. With these four chords you can play countless songs in the key of A major.
Recommended Lessons, Series & Resources
- Series: Key Signatures -A Major and F♯ Minor
- Lesson: Primary Chords of A Major
Using the Quarter Note Strum and Quarter Note Strum - Variations and focus on switching between A, D, E, and E7.
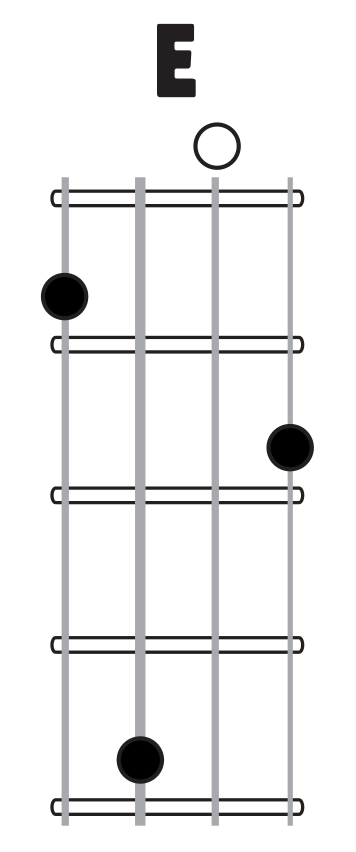
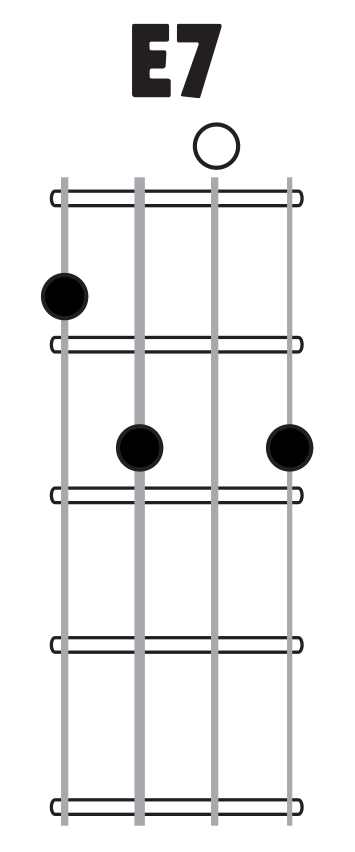
Ultimately any chord can go an any chord so practice all the following combinations:
- D to G
- D to E
- D to E7
- G to D
- G to E7
- G to E7
- A to D
- A to G
- A to E7
- E7 to A
- E7 to D
- E7 to G
This will cover all possible connections. Practice switching at a SLOW tempo and slowly increase the tempo as you get comfortable with the chords.
Visualize the next chord while you are on the current chord.
Recommended Lessons, Series & Resources
- Lesson: Three Chord Progressions
With these Three Chords you can play a lot of songs.
Common Progressions - Key of A
With the primary and secondary chords in the key of A.
Recommended Lessons, Series & Resources
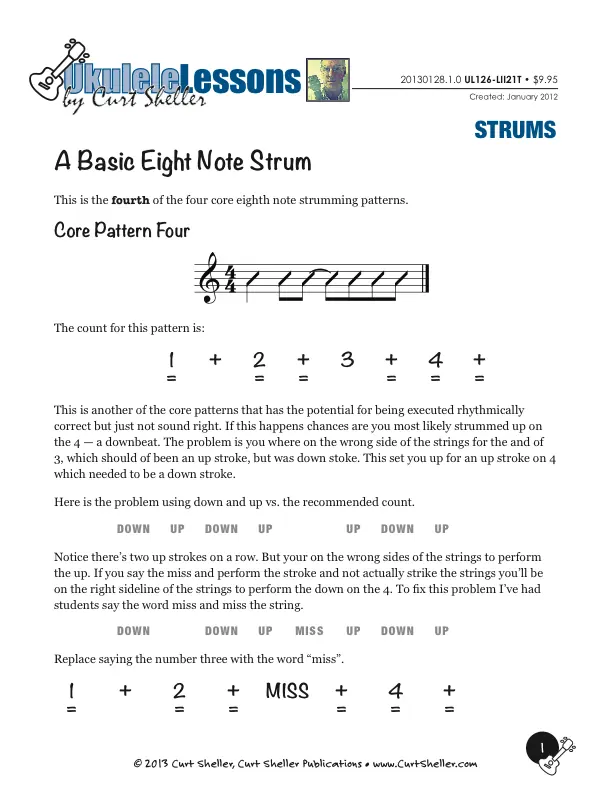
Core Strumming Pattern Four
This is the last of the four core strumming patterns. Theses are some of the most famous strumming patterns used - this one in particular is very popular.
Recommended Lessons, Series & Resources
- Lesson: Strumming Pattern Four
- Lesson: Strumming Patterns Review
Melodic Ear Training
Now that you know a bit about intervals, it’s time to start and recognize them by ear. This is where you can truly start to learn to Play by Ear
Functional pitch recognition involves identifying the function or role of a single pitch in the context of an established tonic. Once a tonic has been established, each subsequent pitch may be classified without direct reference to accompanying pitches. For example, once the tonic G has been established, listeners may recognize that the pitch D plays the role of the dominant in the key of G. No reference to any other pitch is required to establish this fact.
Recommended Lessons, Series & Resources
- Lesson: Melodic Ear Training



End of Lesson - Thanks, Hope You Enjoyed It!
Related Lessons, Videos, Lesson Series, Songs, Books & Reference Charts, Resources & Assets, Workshops are below.